Saturday, 17 March 2012

How To Enable Checkboxes On Icons In Windows 7, Vista and Xp

Comments
 
Selecting multiple files using the all so common ctrl+click method can get pretty tedious. And the worst part is if you accidently let go off the the ctrl button while selecting any file, all your selections just vanish. Now a better way to select multiple files in windows would be by using checkboxes. The people working in Microsoft realized this and provided a simple option to enable check boxes in windows vista and windows 7. But they never told it to the consumers.


So lets see how can we get these check boxes on icons in Windows Vista and 7. Later on in the article I will tell you how you could get this feature in windows Xp using a small program called TrayProdder.


Enable Checkboxes On Icons In Windows Vista and 7:


1. Launch Folder Options:

There are many ways to launch folder options in windows vista and 7. You can either:

a). Go to control panel. Switch to small icons and open folder options from there

b). In the windows explorer, go to tools and then select folder options

c). Go to start, type folder options in the search bar and open it from there


2. Enable the check boxes:

a). Once in the folder options, click on the view tab
b). Under the advanced settings, you will see an option 'use check boxes to select items'. Check that.
c). Click on OK

From now on, you will notice that a small check box will appear when you move your mouse cursor on any file or folder, at the top left corner of the icon. You can use this check box to select any number of files. No need to hold the Shift and Ctrl key anymore. Also there is a small box under the menu bar that will let you select all items.


Note: In case you miss any check box while trying to select a file, or you click on the icon instead of the check box, the operating system removes all the checks that you have placed in any boxes so far.


Enable Checkboxes In Windows Xp:

This feature is not available in windows Xp by default. But a small program based on the .net framework provides this functionality in windows Xp too. Its not that good though. The program is Trayprodder (requires .net 3.5).

1. Download TrayProdder from here.

2. Once downloaded extract it and open it. You will see a window like this


3.  Select the 'Checkboxes' and 'Full row select' Check boxes.

4. Now just open any folder and you should see the checkboxes in upper left corner of each file


Note: Switch to details view for easier control. You may have to close and reopen the folder once you apply the details view.

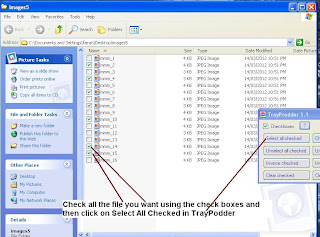
5. Now to select files, check the check boxes for the files you want to select and then click 'Select all Checked' in TrayProdder.


6. Once you do that all the files you checked will get selected and you can then cut, copy, delete or do anything with those files.

In case you still prefer the ctrl+click method to select files here's a tip. To select mutiple files using the keyboard you can use the arrow keys and the space key. So hold on to the ctrl button, use arrow keys to move to the file you want, and then press the space key to select the file. This may be helpful in certain situations.

Talking about Windows Xp, I agree TrayProdder isn't the best piece of software you will find but it gets the work done. And it can be quite helpful at times.

Also there aren't any alternatives available to TrayProdder. If you know of some alternative, share it in the comment section below. Hope you like it.

Thanks for reading.
Readmore...
Thursday, 15 March 2012

Use Full Sized Pictures As Emoticons In Facebook Chat

19 comments
 
Well I guess you all are aware of the fact, that you can use profile pictures of people on facebook in facebook chat, using a simple trick. If not have a look at this:


But the problem with that trick is that the pictures that appear are really small and are hardly visible. It would be much better if we could use bigger pictures too. And its possible . Don't believe it? Try chatting with any of your friends on facebook and paste the following code there:

[[262286870522932]] [[262286900522929]] [[262286913856261]] [[262286923856260]]
[[262286950522924]] [[262286970522922]] [[262286987189587]] [[262287007189585]]
[[262287037189582]] [[262287053856247]] [[262287077189578]] [[262287087189577]]
[[262287097189576]] [[262287113856241]] [[262287140522905]] [[262287170522902]]

If done right you will see something like this.


Basically to do this you will have to slice the bigger picture into smaller parts, upload them separately and combine them together using the photo Ids in facebook chat. This is exactly what I am going to show to you in this post. At the end of this tutorial, you will be able to use any picture you want and turn it into an emoticon for facebook chat. Lets begin.


Use Full Sized Pictures As Emoticons In Facebook Chat:

Difficulty: Moderate       Time required: 10 min approx

I have divided the process in 3 parts:

1. Splitting the Picture into smaller Pictures

2. Uploading the Pictures to Facebook

3. Preparing the codes


1. Slicing the Picture into smaller Pictures:

You can use any tool to slice the image into smaller images. For this tutorial I am going to use a free software called Image Cut.

1. First download Image Cut from here.

2. Install it and then open it.

3. Once opened, click on the first icon on the left panel and select the image you want to use and click on open.


4. You will see that the image has now loaded. Next click on the 'Add Grid' button on the left pane. In the add grid window, choose the number of horizontal and vertical cells you want the image to be divided into. The higher the number you choose here the larger will the final image appear in facebook chat. For now choose 4 for both horizontal and vertical cells.

Note: The cells should be proportional to image's length and width.  For best result use a square image.


5. Now click on the split button in the left pane and a window will open up.

6. In the split window, select the first image and change the part file type to 'jpg'. Then click on the small icon with a tick on it in the bottom right corner of the window.


7. Choose the output folder and image subpath, Finally click on save parts.


To make sure everything worked fine open the folder where you saved the image parts. You should see 16 images there numbered 1 to 16 in the end. This completes the first step.


2. Uploading the pictures to facebook:

To use the image in facebook chat, you will first have to upload all those smaller images to facebook. For that you should preferably create your own facebook page. You can upload pics to your profile too but that won't be a nice idea. Creating a facebook page is easy and would not take more than 2-3 mins.


1.  First go to this link https://www.facebook.com/pages/create.php

2. Choose cause or community in the page type and name it anything you want. Check "I agree to facebook Pages Terms" and click on get started.


3. Skip through all the unnecessary steps. Keep clicking skip and next button until your page is ready


4. Once you get to see the main page, click on photos to upload the photos.


5. Click on "Add more photos", browse to the folder where the pictures are stored, select all photos and click on open.


6. Once uploaded click on post photos


This completes the uploading part.


3. Prepare the final code:

Now comes the boring part. In this step you will have to note down the Photo Id of each of the 16 images you uploaded earlier and then arrange them together. To help get through this step, I created a small program in visual C++ called facebook emoticon maker.

You can download it here: Download facebook emoticon maker

1. Now open the album where you uploaded the pictures in the last step and open the first picture:


2. Take a look at the Url of the picture. You will see something like this:

"https://www.facebook.com/photo.php?fbid=262286870522932&set=a.262285093856443.63246.262284137189872&type=3&theater"


3. The Photo Id is the number followed by '?fbid='

'262286870522932' in this case

4. Now open the program "Facebook Emoticon Maker" you downloaded earlier.

5. As soon as you open the program, it will ask you to enter the number of rows and columns. Since the image was sliced into 4x4 parts, enter 4 for both rows and columns here and click on OK.


6. Now you will see another window open up with 16 text boxes in it arranged in a 4x4 format. Copy the photo Id of the first image and paste it in the first text box.


7. Similarly browse to the next picture in the album, note its photo Id and paste it in the second text box. Repeat this step until all the 16 boxes are filled. Finally click on the generate button.

8. You will notice that as soon as you click on the generate button the text box in the bottom left corner is filled with some code. This is the final code. Right click in that text box, then click on select all and then finally copy it.


Now its time to test the code. Go ahead and start chatting with any of your friends and paste this code in the chat box and see what happens. What was their reaction???


This complete the tutorial. You can save the code generated in the end, in notepad or any other word editing software for later use. In case you find this whole process too tough, but still want to use any particular image in facebook chat, mail it to me at digital.worldzzz@gmail.com. And I will convert it for you and send you the code.


Feel free to ask anything in the comments section below. 


Thanks for reading.
Readmore...