Selecting multiple files using the all so common ctrl+click method can get pretty tedious. And the worst part is if you accidently let go off the the ctrl button while selecting any file, all your selections just vanish. Now a better way to select multiple files in windows would be by using checkboxes. The people working in Microsoft realized this and provided a simple option to enable check boxes in windows vista and windows 7. But they never told it to the consumers.
So lets see how can we get these check boxes on icons in Windows Vista and 7. Later on in the article I will tell you how you could get this feature in windows Xp using a small program called TrayProdder.
Enable Checkboxes On Icons In Windows Vista and 7:1. Launch Folder Options:
There are many ways to launch folder options in windows vista and 7. You can either:
a). Go to control panel. Switch to small icons and open folder options from there
b). In the windows explorer, go to tools and then select folder options
c). Go to start, type folder options in the search bar and open it from there
2. Enable the check boxes:
a). Once in the folder options, click on the view tab
b). Under the advanced settings, you will see an option 'use check boxes to select items'. Check that.
c). Click on OK
From now on, you will notice that a small check box will appear when you move your mouse cursor on any file or folder, at the top left corner of the icon. You can use this check box to select any number of files. No need to hold the Shift and Ctrl key anymore. Also there is a small box under the menu bar that will let you select all items.
Note: In case you miss any check box while trying to select a file, or you click on the icon instead of the check box, the operating system removes all the checks that you have placed in any boxes so far.
Enable Checkboxes In Windows Xp:
This feature is not available in windows Xp by default. But a small program based on the .net framework provides this functionality in windows Xp too. Its not that good though. The program is Trayprodder (requires .net 3.5).
1. Download TrayProdder from here.
2. Once downloaded extract it and open it. You will see a window like this
3. Select the 'Checkboxes' and 'Full row select' Check boxes.
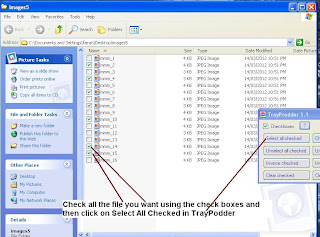
4. Now just open any folder and you should see the checkboxes in upper left corner of each file
Note: Switch to details view for easier control. You may have to close and reopen the folder once you apply the details view.
5. Now to select files, check the check boxes for the files you want to select and then click 'Select all Checked' in TrayProdder.
6. Once you do that all the files you checked will get selected and you can then cut, copy, delete or do anything with those files.
In case you still prefer the ctrl+click method to select files here's a tip. To select mutiple files using the keyboard you can use the arrow keys and the space key. So hold on to the ctrl button, use arrow keys to move to the file you want, and then press the space key to select the file. This may be helpful in certain situations.
Talking about Windows Xp, I agree TrayProdder isn't the best piece of software you will find but it gets the work done. And it can be quite helpful at times.
Also there aren't any alternatives available to TrayProdder. If you know of some alternative, share it in the comment section below. Hope you like it.


 Receive Free Email Updates


